|
|
 02-21-2012, 01:49 AM
|
#481
|
|
|
Re: Customizing Q&A Thread
Sadly I never touched a model piece and I looked up the price of a crazy straw and they aren't cheap. Plus its a waste since most of the straw is curvy.
|

|

|
|
03-05-2012, 10:22 PM
|
#482
|
|
|
Re: Customizing Q&A Thread
Even though this isn't the Hercules thread, I think this thread will have the know-how.
I'm trying to do the Heavy Labor hip replacement, and I can not, for the life of me, get that small screw in the black torso joint out. I think the Hercules of Greek myth was the guy who screwed it in. It does not want to move.
I'm using a good set of screwdrivers, and the Phillips head is starting to strip the screw. The metal of the screw is giving way before the screw itself is moving.
I've been trying with a flathead, but I've made no progress.
Suggestions?
|
|
|
|
|
03-06-2012, 09:48 AM
|
#483
|
Location: calgary alberta
|
Re: Customizing Q&A Thread
^pics?(i didn't get this guy as i'm building my own devs)
one trick i use is to make sure the screw driver is seated in all the way into the screw head,then lighty tap it with a hammer to jar it.(this is also a autobody trick to loosen or "crack the seal" to remove rusty ass bolts on older hondas)
another way would be the "echotransformer's" route,dip him in hot water for a bit,ensuring the plastic area around the screw is nice and heated,then try backin out the screw.
worst case scenario,canadian tire has a drill bit set called "screw-out",specifically designed to remove messed up screws.whether or not it'll fit into the actual screw shaft hole i don't know as i don't have the hercules bots.
hope that helps
__________________
now open for commissions...big and small...minor and heavy,you dream it,i make it.
|
|
|
|
|
03-19-2012, 05:22 PM
|
#484
|
|
|
Re: Customizing Q&A Thread
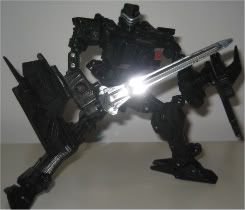
Here's a pic:

Thanks for the suggestions and sorry it took me so long to get back. I tried tapping it with a hammer and submerging the area in very hot water -- near boiling for 2 minutes, multiple times. Neither worked. The screw doesn't want to budge.
As you can see, the screw is inside a cylindrical housing. I don't know how the CT screw remover works, but I suspect this will be hard to get at.
|
|
|
|
|
03-19-2012, 05:26 PM
|
#485
|
|
|
Re: Customizing Q&A Thread
Quote:
Originally Posted by chans formers

^pics?(i didn't get this guy as i'm building my own devs)
one trick i use is to make sure the screw driver is seated in all the way into the screw head,then lighty tap it with a hammer to jar it.(this is also a autobody trick to loosen or "crack the seal" to remove rusty ass bolts on older hondas)
another way would be the "echotransformer's" route,dip him in hot water for a bit,ensuring the plastic area around the screw is nice and heated,then try backin out the screw.
worst case scenario,canadian tire has a drill bit set called "screw-out",specifically designed to remove messed up screws.whether or not it'll fit into the actual screw shaft hole i don't know as i don't have the hercules bots.
hope that helps
|
can they do it in store? My son has a remote for his TRIbot robot... and the screw in it has been stripped.
|
|
|
|
|
03-19-2012, 07:26 PM
|
#486
|
|
|
Re: Customizing Q&A Thread
Quote:
Originally Posted by gagagalvatron
Here's a pic:
Thanks for the suggestions and sorry it took me so long to get back. I tried tapping it with a hammer and submerging the area in very hot water -- near boiling for 2 minutes, multiple times. Neither worked. The screw doesn't want to budge.
As you can see, the screw is inside a cylindrical housing. I don't know how the CT screw remover works, but I suspect this will be hard to get at.
|
Correct me if I'm wrong, but you want to take the black piece & the legs out, right? or is it just the black piece?
Why not take the green hip section apart to remove the pieces?
Edit: here's a vid my buddy T2RX6 (DemonSS) did on fixing HL, maybe that will help you out.
http://www.youtube.com/watch?v=AEP6t...Q6HZwNhPPWbWQ=
__________________
Quote:
Originally Posted by Dark Rage
You know you're old when you feel the effects of inflation on food.
You know you're an old nerd when you feel the effects of inflation on action figures.
|
Youtube Twitter
Last edited by Nemesis Predaking; 03-19-2012 at 07:29 PM.
|
|
|
|
|
03-19-2012, 07:34 PM
|
#487
|
|
|
Re: Customizing Q&A Thread
I suggest drilling the screw out. That's what you wil have to do to use an extractor anyway. The screw extractors from CT will not be small enough. It won't be easy but it's the only way to remove it if the head is stripped. You may have trouble finding a bit that small. 1/16 is the most common small bit size in most kits.
Drill straight down and go very slowly. If you have access to a drill press that will help.
__________________
"Actual change time may vary."
|
|
|
|
|
03-22-2012, 08:01 PM
|
#488
|
|
|
Re: Customizing Q&A Thread
I have never done any customizing and have read this thread from start to finish. I wish to make my first attempts on an RID Prime & Cliffjumper. The Prime will be the harder of the two I am going for.
1) What would be the best type of paints to use?
2) Brushes or spray paints?
3) Is the alchohol or nail poish remover necessary?
Any help would be appreciated. I bought the RID prime but already have the FE and thought the RID isn't as nice and want to try a repaint. Any tips would be helpful. Thanks
|
|
|
|
|
03-23-2012, 07:45 PM
|
#489
|
|
|
Re: Customizing Q&A Thread
Since I know nothing about this someone mentioned tamiya paints. where can i get them in the gta and can i clearcoat over it after it's done?
|
|
|
|
|
03-24-2012, 01:33 AM
|
#490
|
Location: calgary alberta
|
Re: Customizing Q&A Thread
Quote:
Originally Posted by wervenom
I have never done any customizing and have read this thread from start to finish. I wish to make my first attempts on an RID Prime & Cliffjumper. The Prime will be the harder of the two I am going for.
1) What would be the best type of paints to use?
2) Brushes or spray paints?
3) Is the alchohol or nail poish remover necessary?
Any help would be appreciated. I bought the RID prime but already have the FE and thought the RID isn't as nice and want to try a repaint. Any tips would be helpful. Thanks
|
1= it's up to you.every customizer out there has their own personal preference.some guys love games work shop paints,some guys like using testors,myself,i like tamiya.
2= spray for large areas,then brushes for detailing.
(or if you're comfortable with it,brush all the way,then a clearcoat spray.
3= alcohol is only necessary if you want to remove paint or tampo's.(some tampoed logos/details will still show through new paint if not sanded/flattened or removed.almost like a 3d imprint under your new paint job.)
otherwise,some good dishsoap and a toothbrush will remove all the mold release agents,grease,etc.
as for the tamiyas,they can be clearcoated.
your local walmarts krylon brand of "krystal clear" clearcoat is totally compatable.just make sure the tamiya is thoroughly dried before clearcoating.
if you get stuck during experimenting,check out the tutorials section here 
__________________
now open for commissions...big and small...minor and heavy,you dream it,i make it.
|
|
|
|
|
|
 Posting Rules
|
You may not post new threads
You may not post replies
You may not post attachments
You may not edit your posts
HTML code is Off
|
|
|
|
|
Donate to Cybertron.ca |
Donations keep this site running, thanks for your support. More details here.
|
|