|
|
 08-22-2011, 01:02 AM
|
#1
|
|
|
SUPER AWESOME MEGA SHAZAM FILLED COMBINER SIZED CUSTOM HANDS TUTORIAL THREAD!
Well Kids, I've had a few people ask me about my custom hands I've built and being the pro that I am I've decided to share my trade secrets with you peasants! lol
This is my first tutorial so if anything isn't clear, let me know and I can fix it  Lets get started,
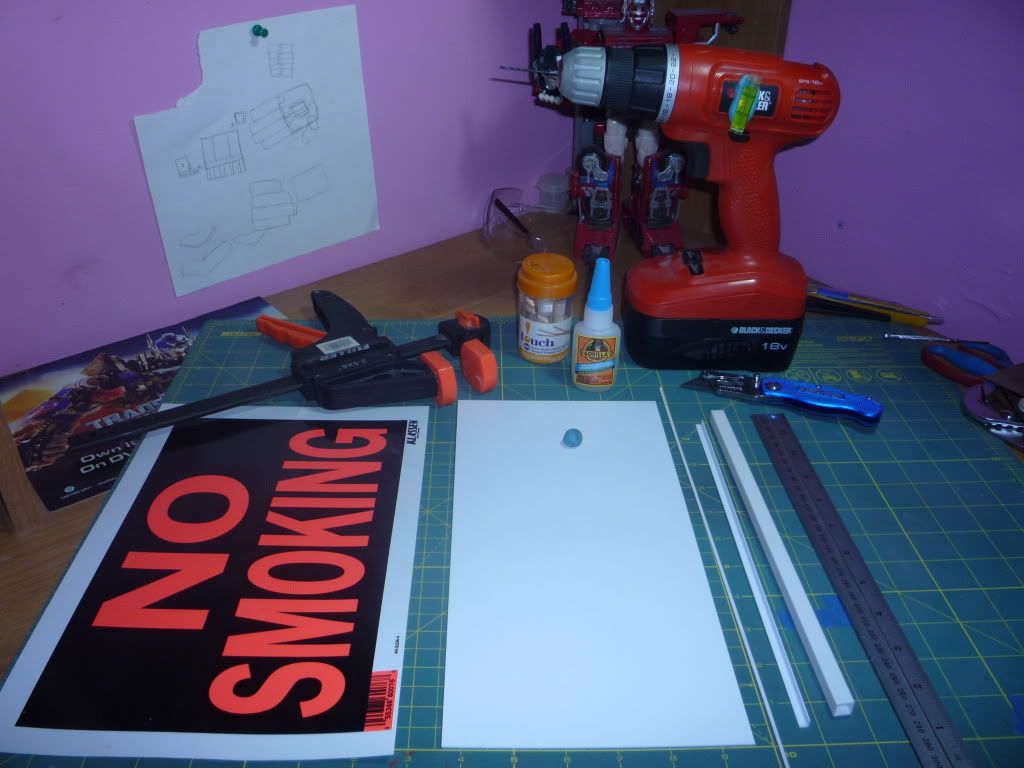 First the tools and things you will need,
Cutting mat/Rotary mat
Yard sale/Room for rent/No smoking signs (They are at Canadian tire and cost $1.00 Vs $5.00 for 2 sheets of styrene, very thin but really good for details and filling gaps)
Styrene.(I'm using 1mm thick for my hands)
Sticky tack
A clamp.
Tooth picks
Gorilla super glue (Its the shiznit!)
Drill with a 5/64" drill bit. (This job will go allot smoother if your drill has a built in level)
Razor knife
.080" Styrene rod.
Styrene L brackets (Cant remember the size)
Square styrene tubes (1/4" is the size I think)
Metal ruler
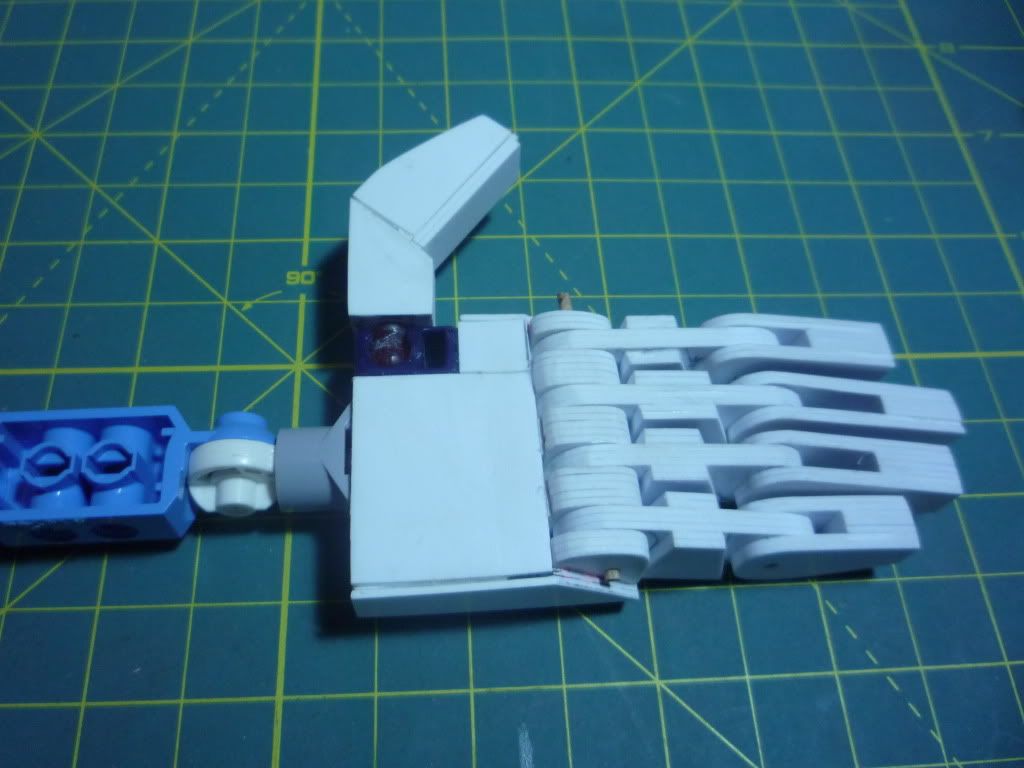
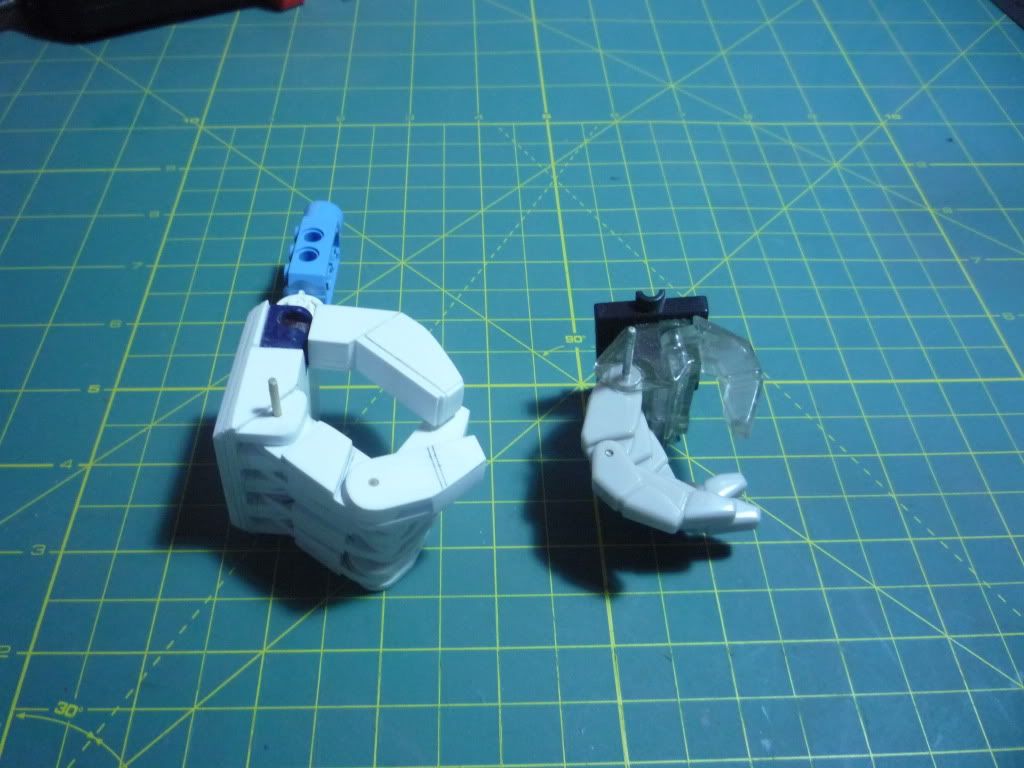
Ok so Ill start by showing you the finished product, IMO I think Primus and Unicron hands are hella lame and with a little effort and some work you can create a one off set of combiner hands
First the tools and things you will need,
Cutting mat/Rotary mat
Yard sale/Room for rent/No smoking signs (They are at Canadian tire and cost $1.00 Vs $5.00 for 2 sheets of styrene, very thin but really good for details and filling gaps)
Styrene.(I'm using 1mm thick for my hands)
Sticky tack
A clamp.
Tooth picks
Gorilla super glue (Its the shiznit!)
Drill with a 5/64" drill bit. (This job will go allot smoother if your drill has a built in level)
Razor knife
.080" Styrene rod.
Styrene L brackets (Cant remember the size)
Square styrene tubes (1/4" is the size I think)
Metal ruler
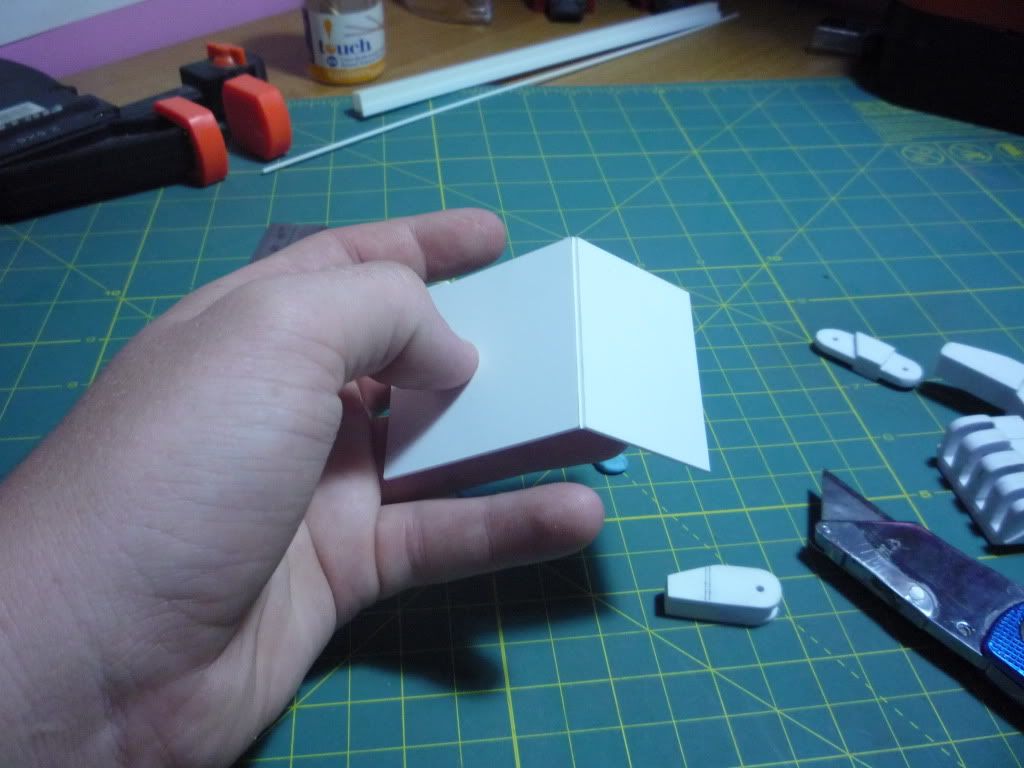
Ok so Ill start by showing you the finished product, IMO I think Primus and Unicron hands are hella lame and with a little effort and some work you can create a one off set of combiner hands 
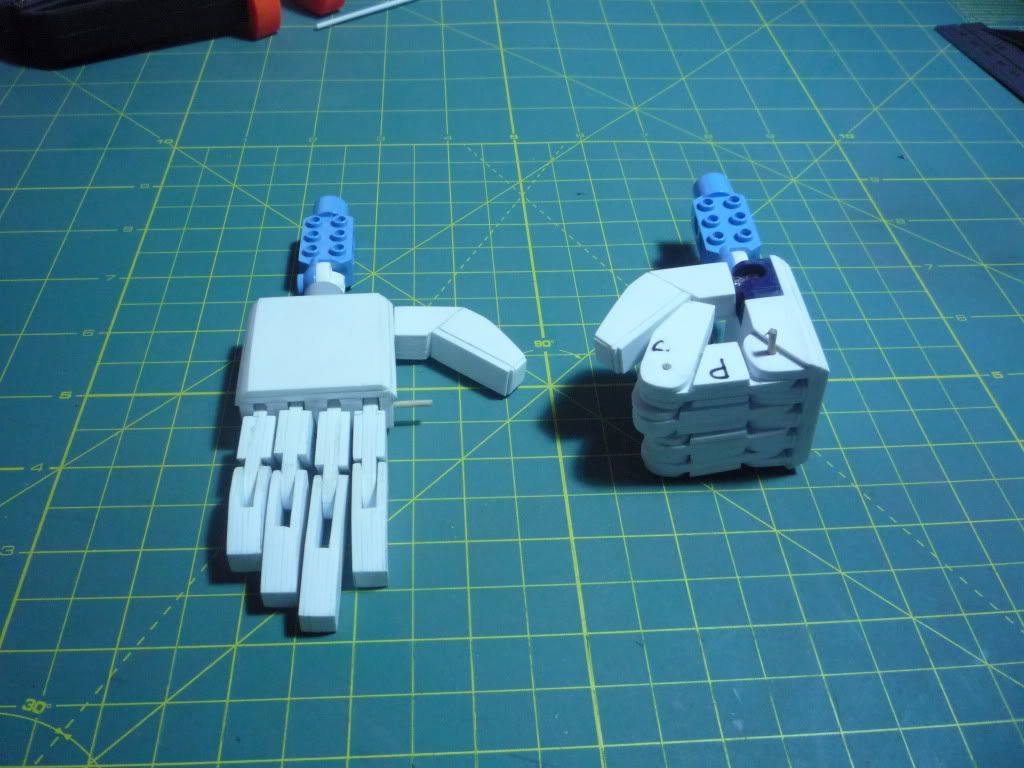 And a pic of them next to Unicrons hands.
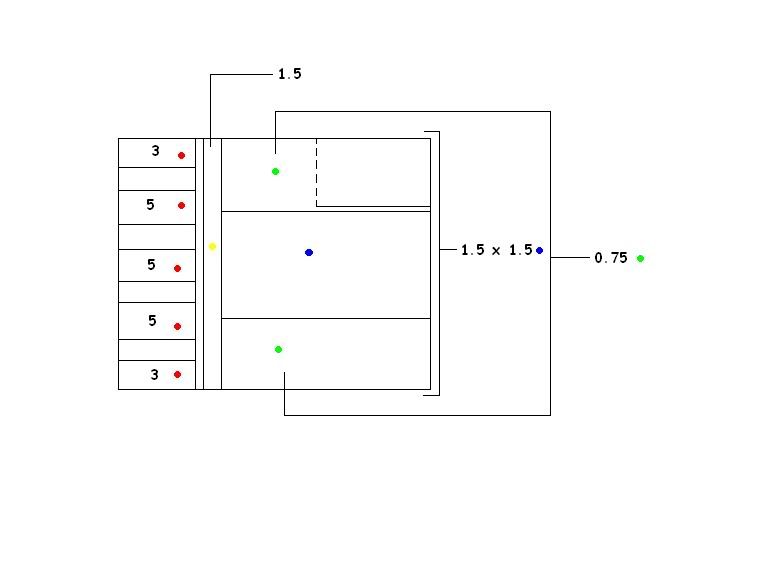
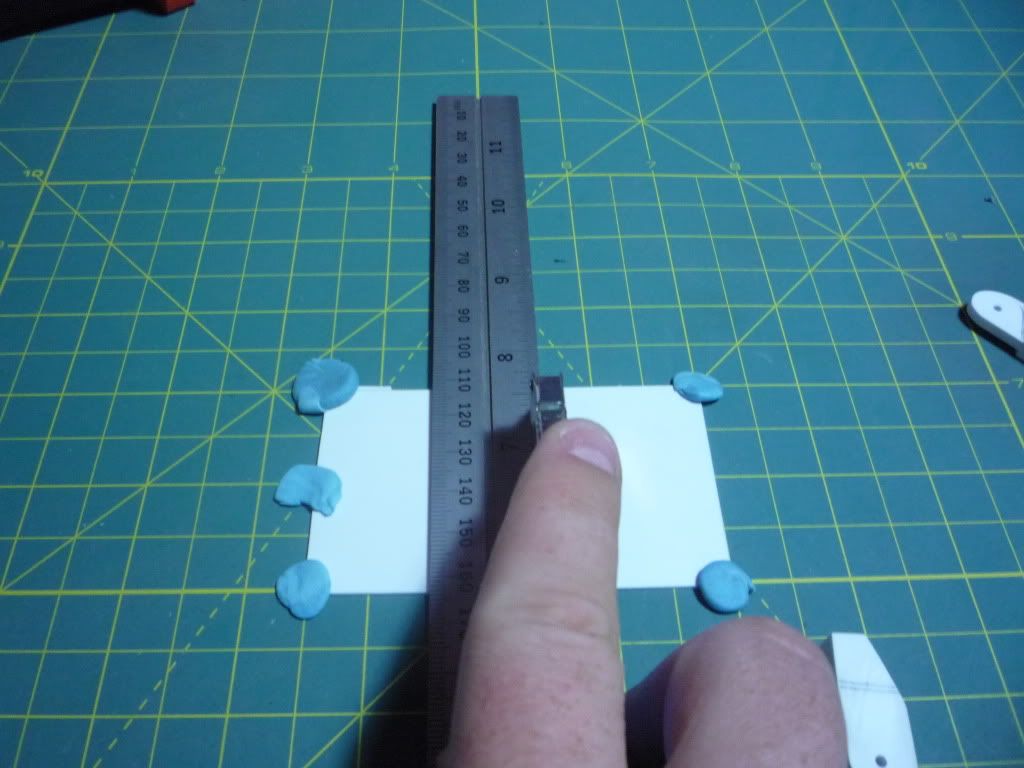
 First step grab your piece of styrene. I'm using scrap styrene for this tutorial. Use the sticky tack to hold down the corners of your styrene so it doesn't slide around on your mat. Using your ruler and a pencil make a line thats 1.5" across.
 Make the cut, go very slow and don't put allot of pressure on the blade. Go over the line 2-3 time and stop.
 Now all you have to do is just snap the piece you just cut and you should have a nice line.
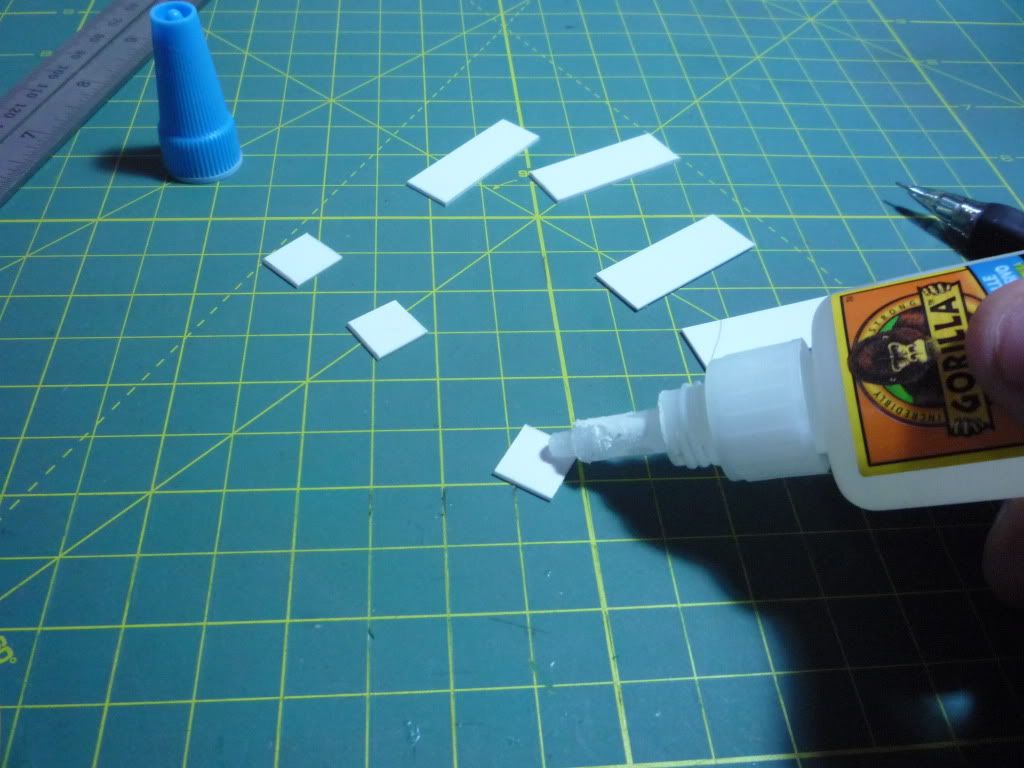
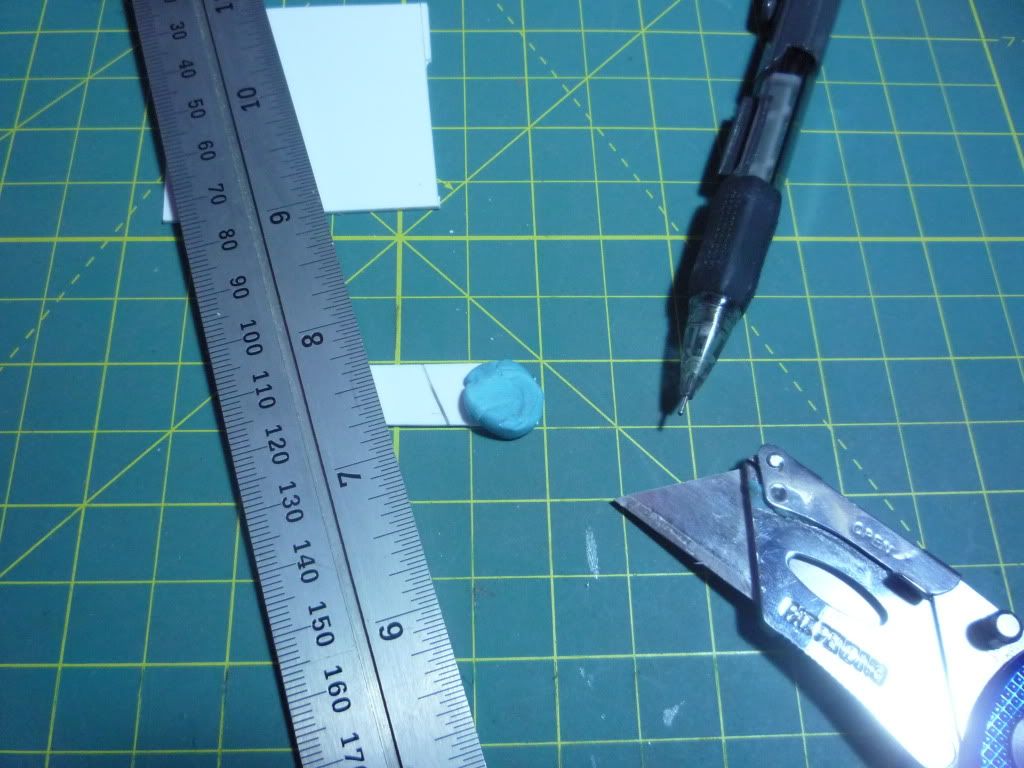
 Use you ruler and measure out and mark four 1.5" x 0.5" pieces that will be used for the outside of your first part of your finger. (3 pieces in the picture but you get the point)
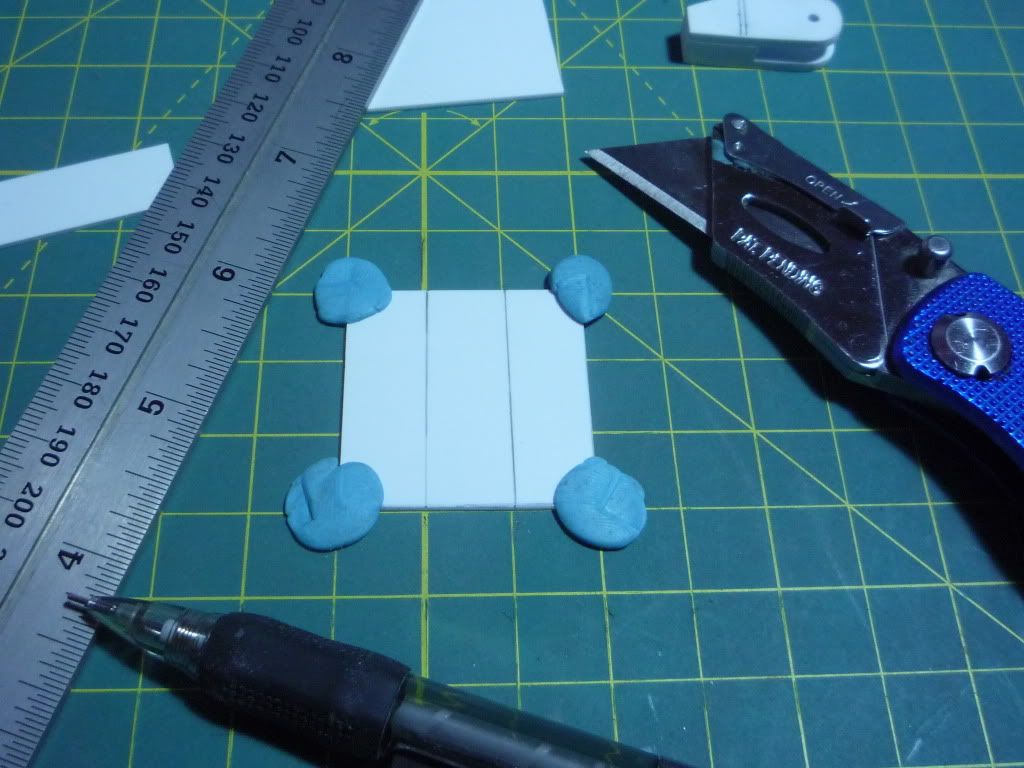 Make the cuts again, just like the step above, go slow, 2-3 times and snap them. Once all 4 pieces are cut set them aside. Every finger will have seven pieces of styrene glued together.
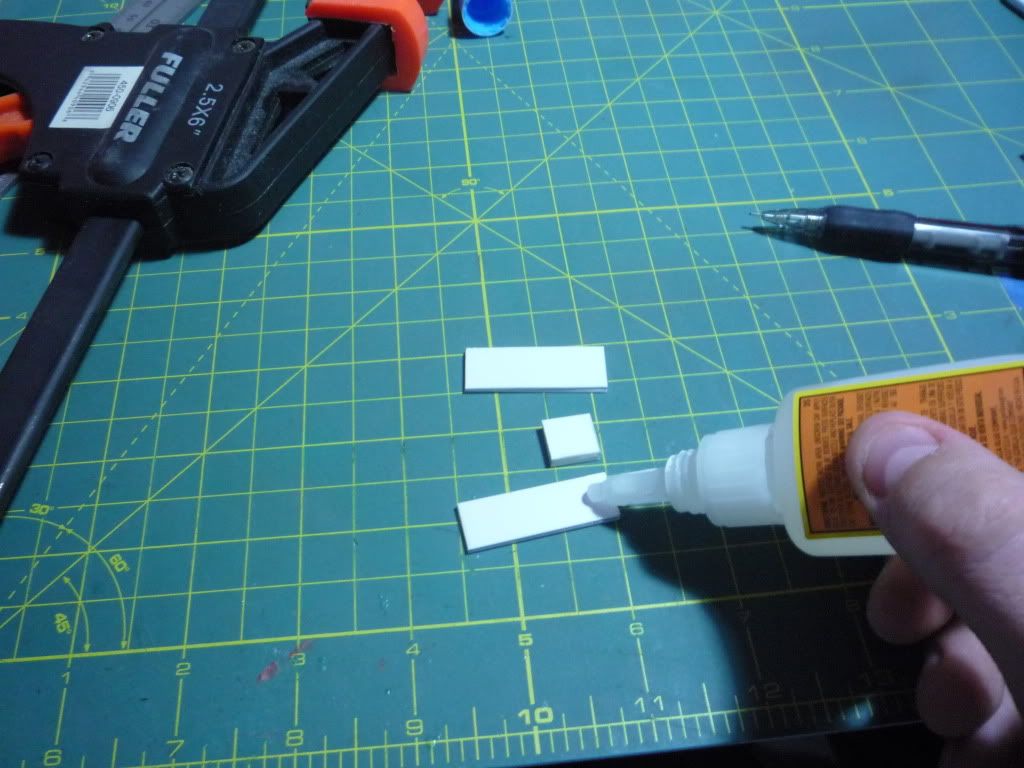
Now with another piece of styrene, measure out three 0.5" x 0.5" squares.
Make the cuts again, just like the step above, go slow, 2-3 times and snap them. Once all 4 pieces are cut set them aside. Every finger will have seven pieces of styrene glued together.
Now with another piece of styrene, measure out three 0.5" x 0.5" squares.
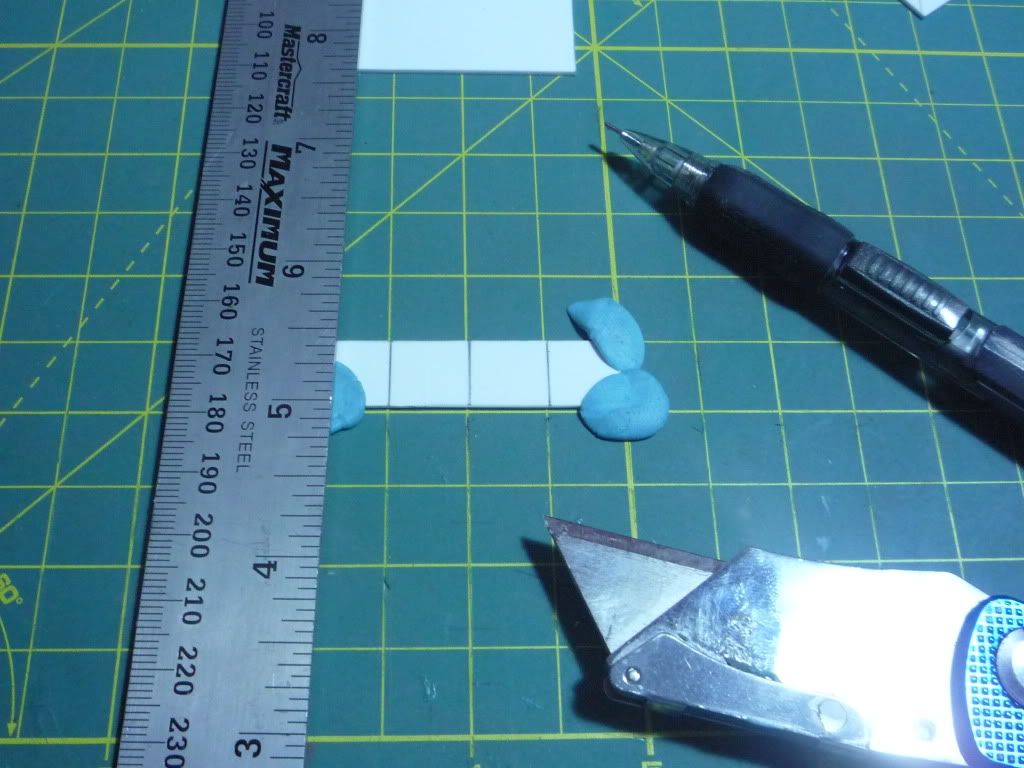 Cut them out and snap them off. Now grab the four 1.5" x 0.5" pieces
__________________
Twitter - Cliffjumper69
Last edited by Cliffjumper69; 08-22-2011 at 01:15 AM.
|

|

|
|
08-22-2011, 01:02 AM
|
#3
|
|
|
Re: SUPER AWESOME MEGA SHAZAM FILLED COMBINER SIZED CUSTOM HANDS TUTORIAL THREAD!
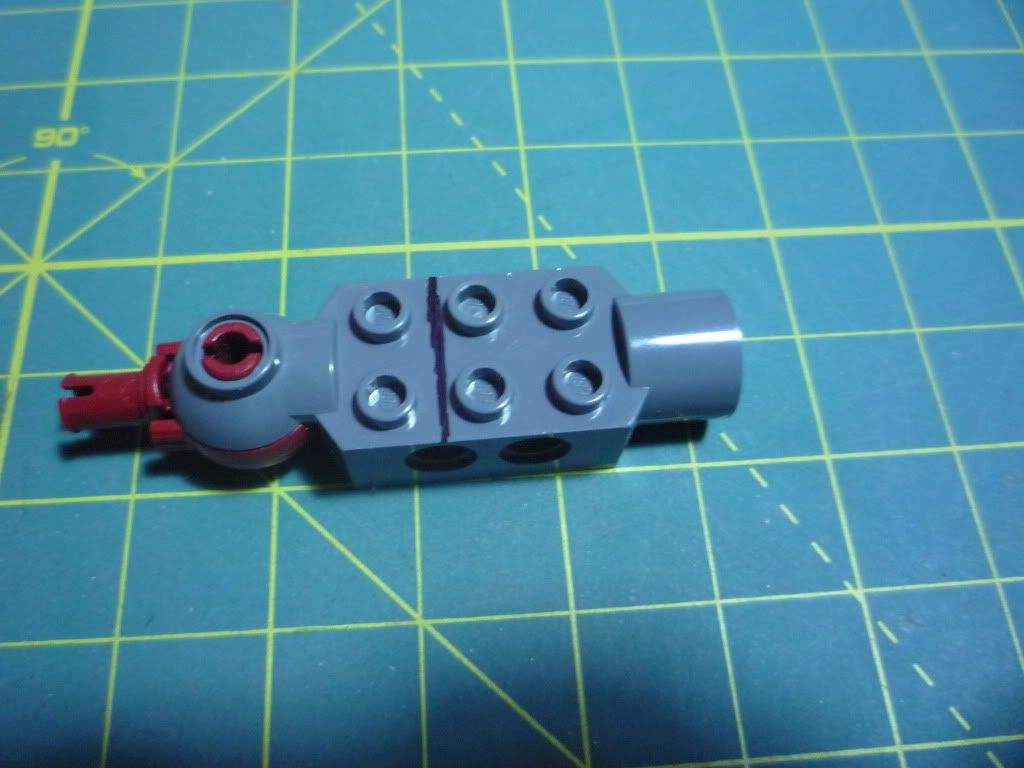
Now were about to start the second part of our finger.
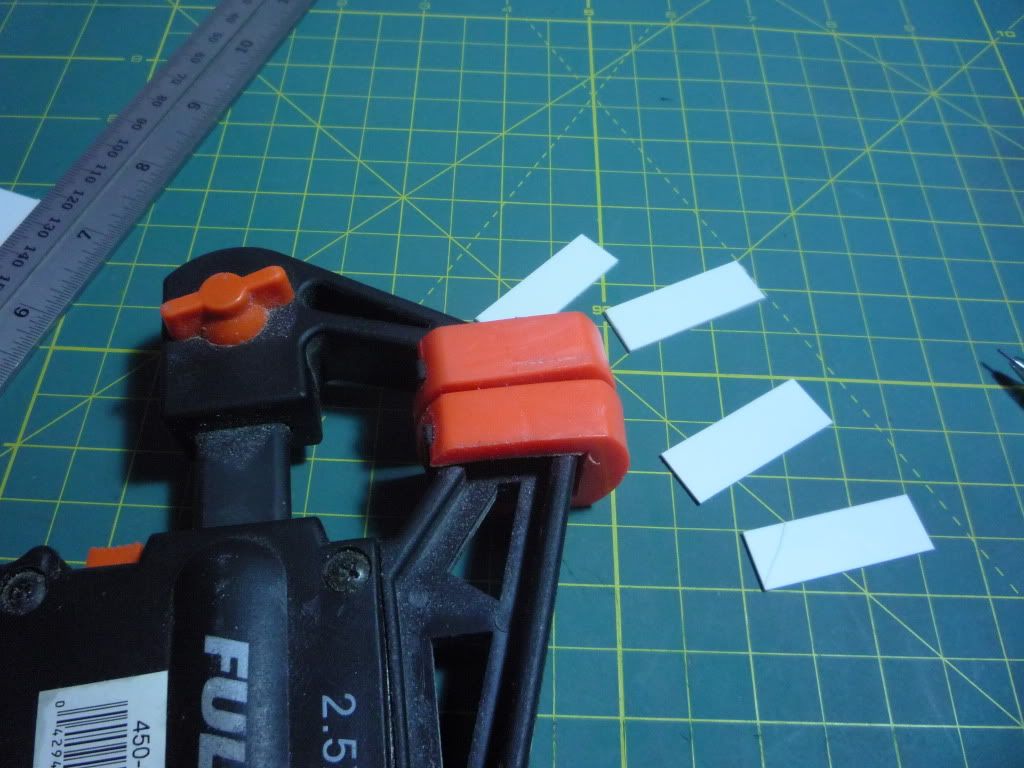
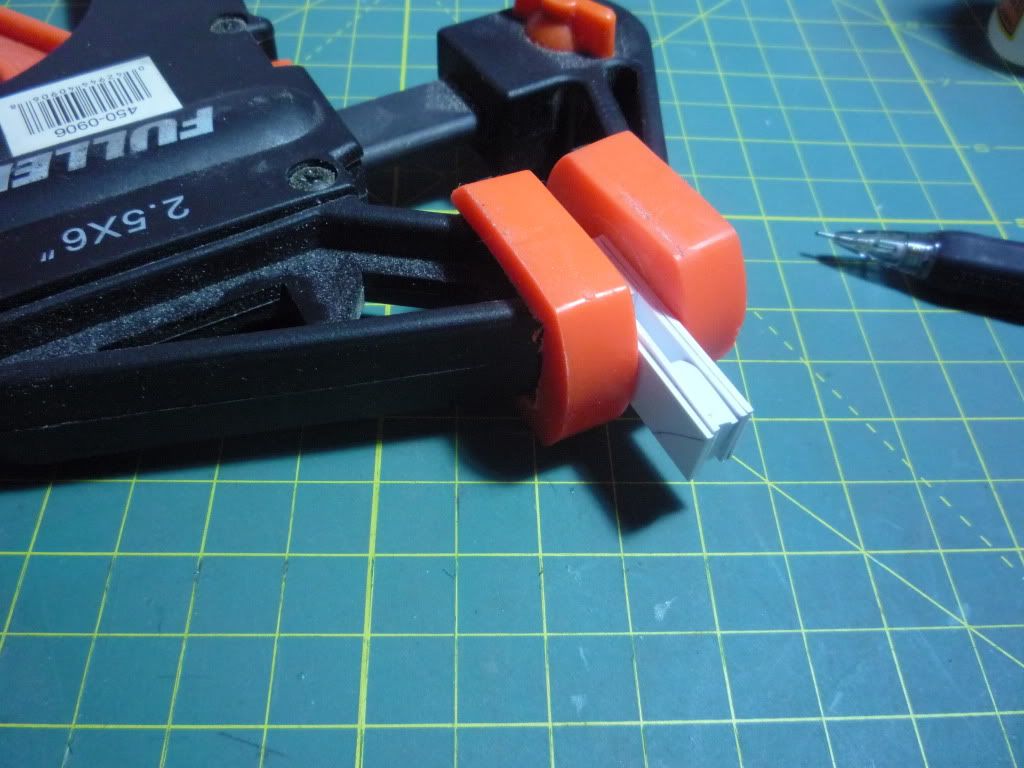
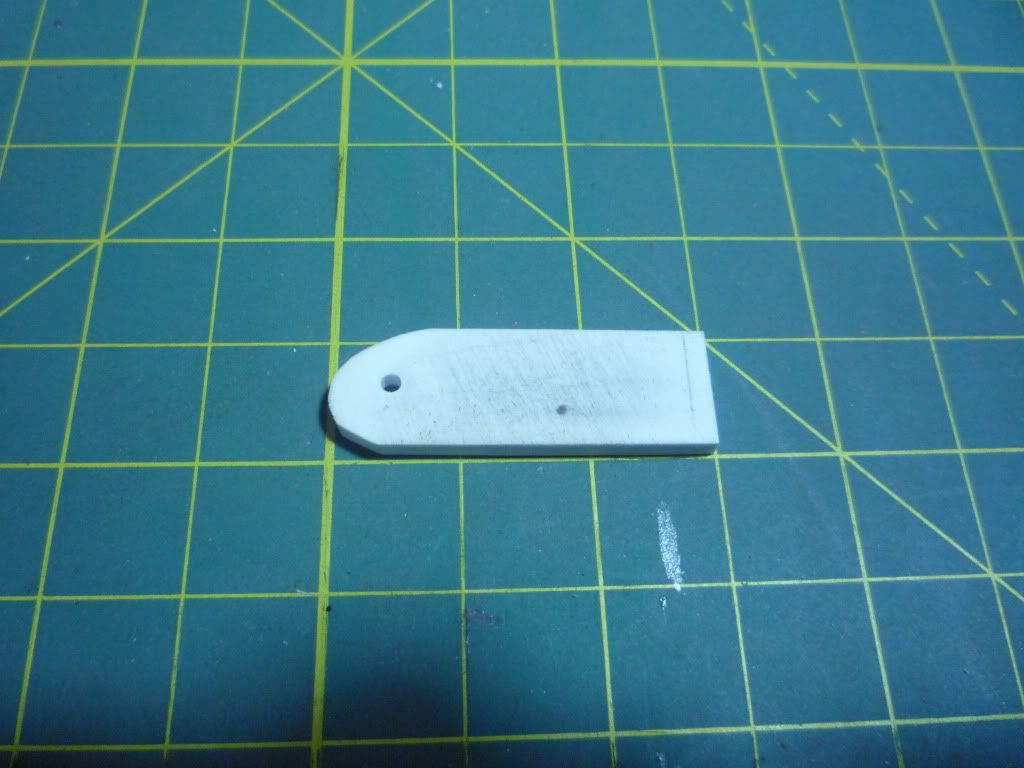
 First you want to cut three 1.5" x 0.5" pieces of styrene. glue them together and clamp them. After that's round the end that will be attached to the first part of your finger, and the other end that will be attached to the hand.
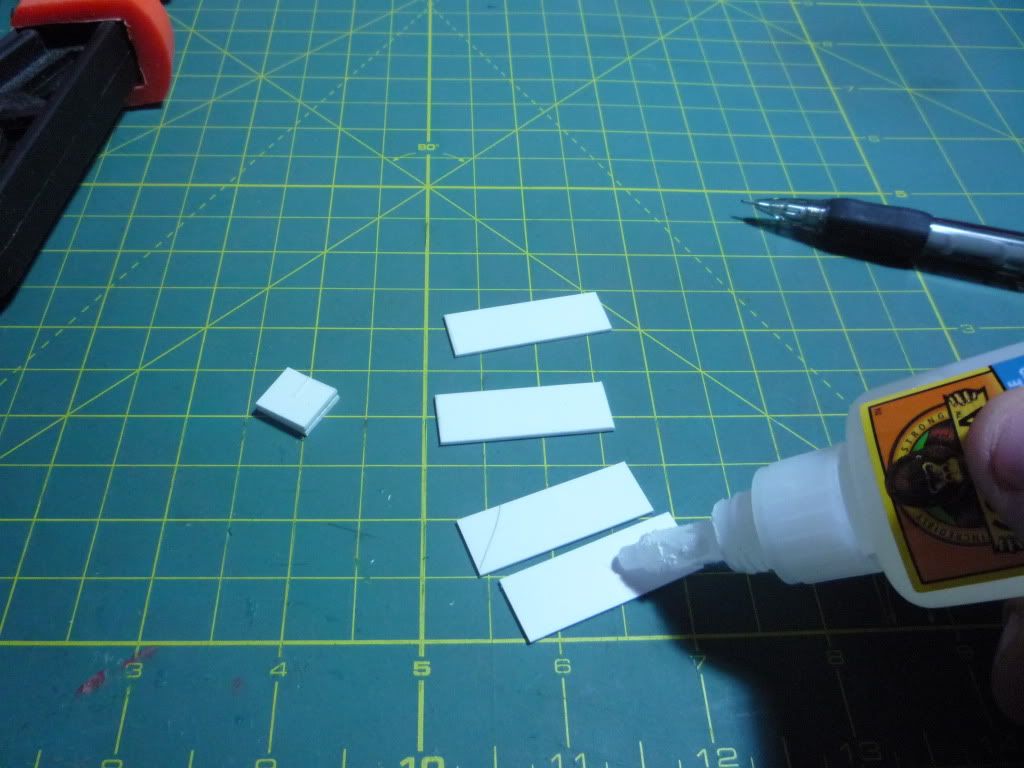
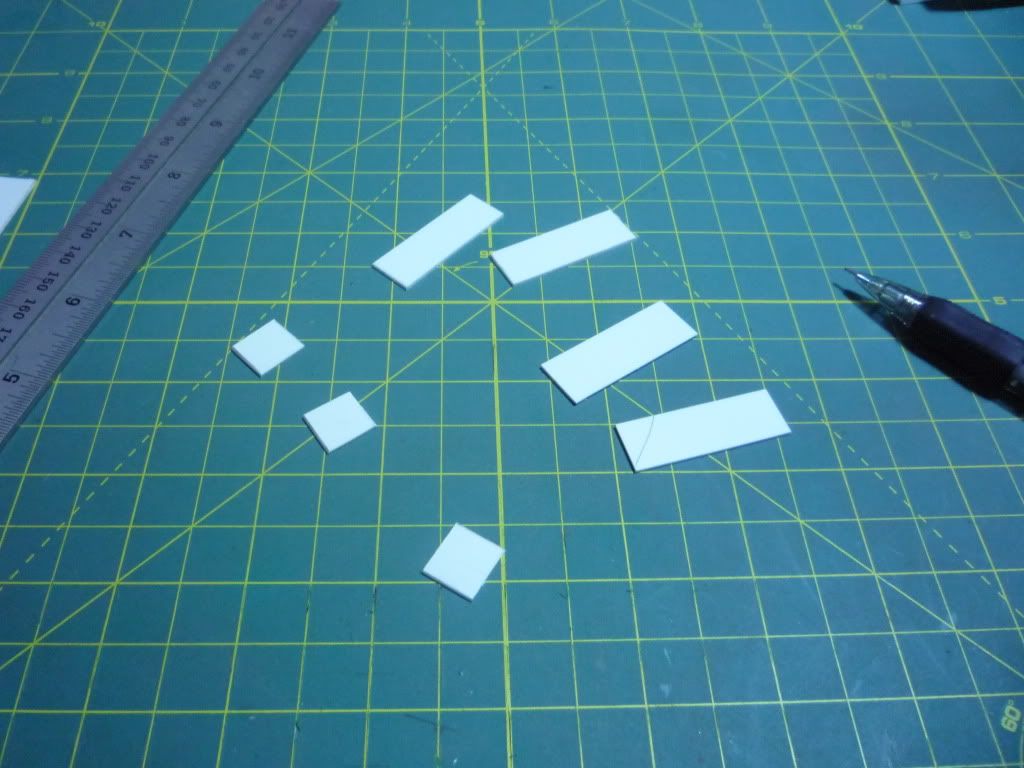
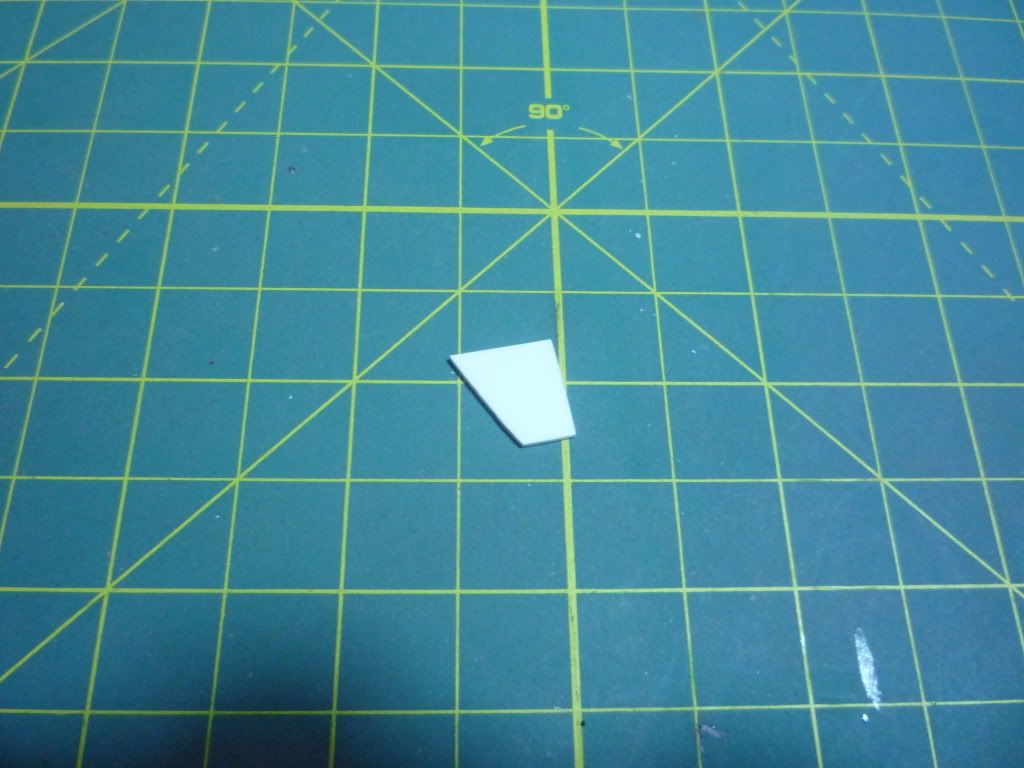
 With another piece of styrene mark out four pieces 0.5" x 0.5" with an angle on them. This will be the outside of your finger.
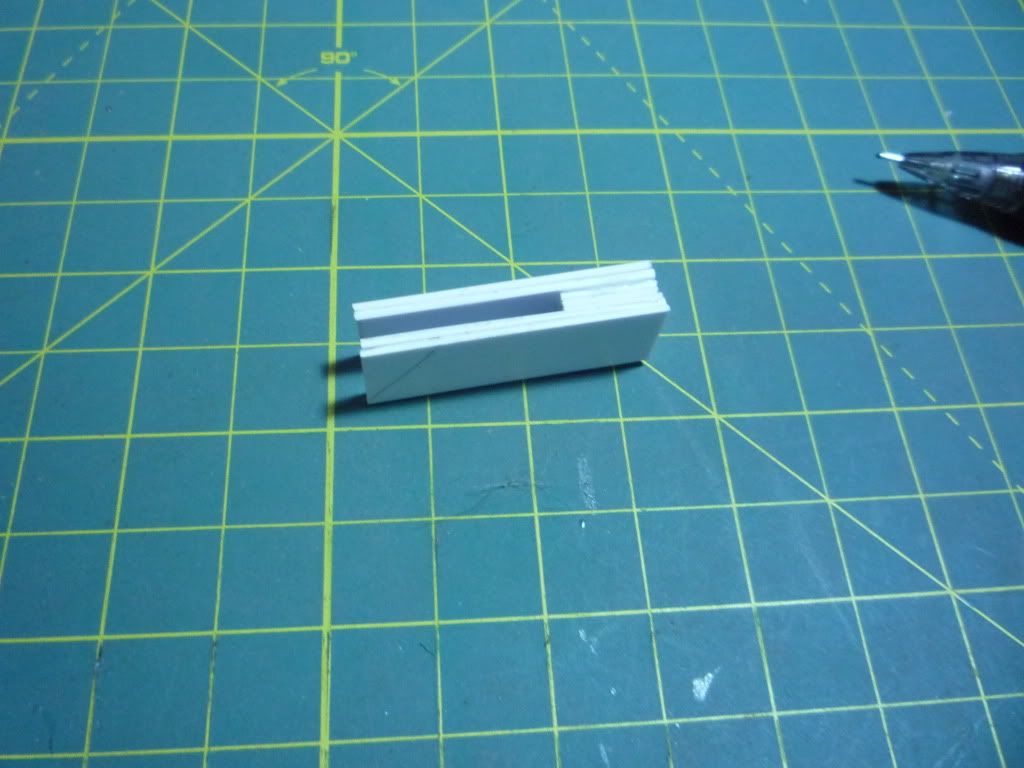
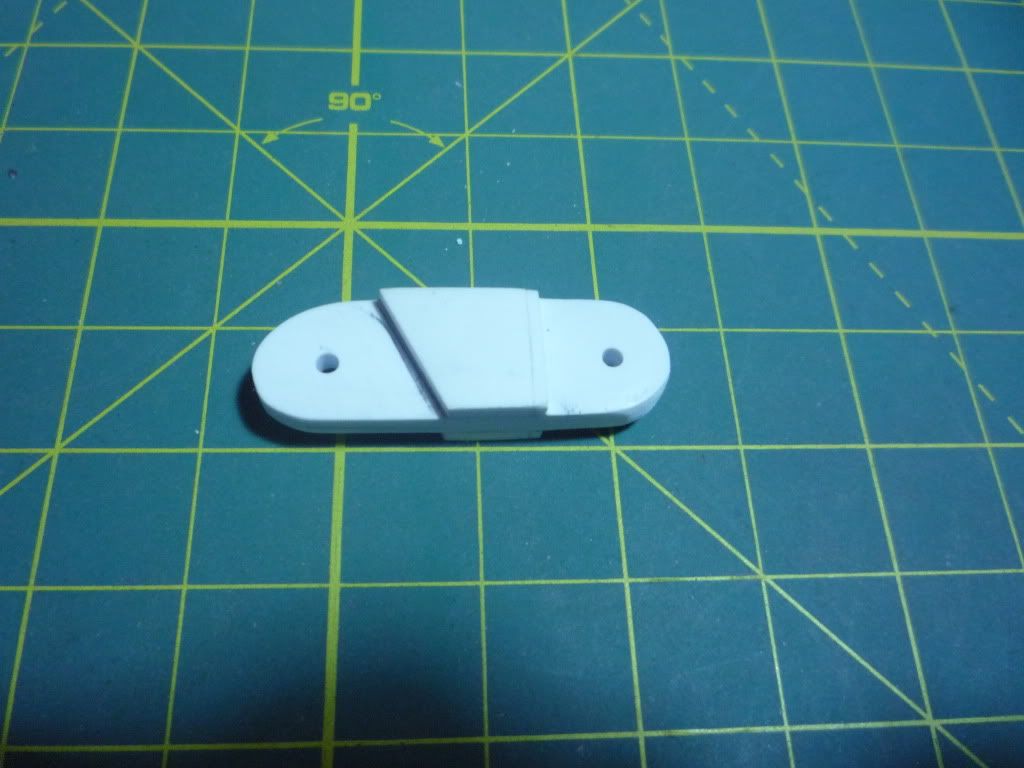
 Once you cut them out they should look like this, if they do, glue each pair together and clamp them.
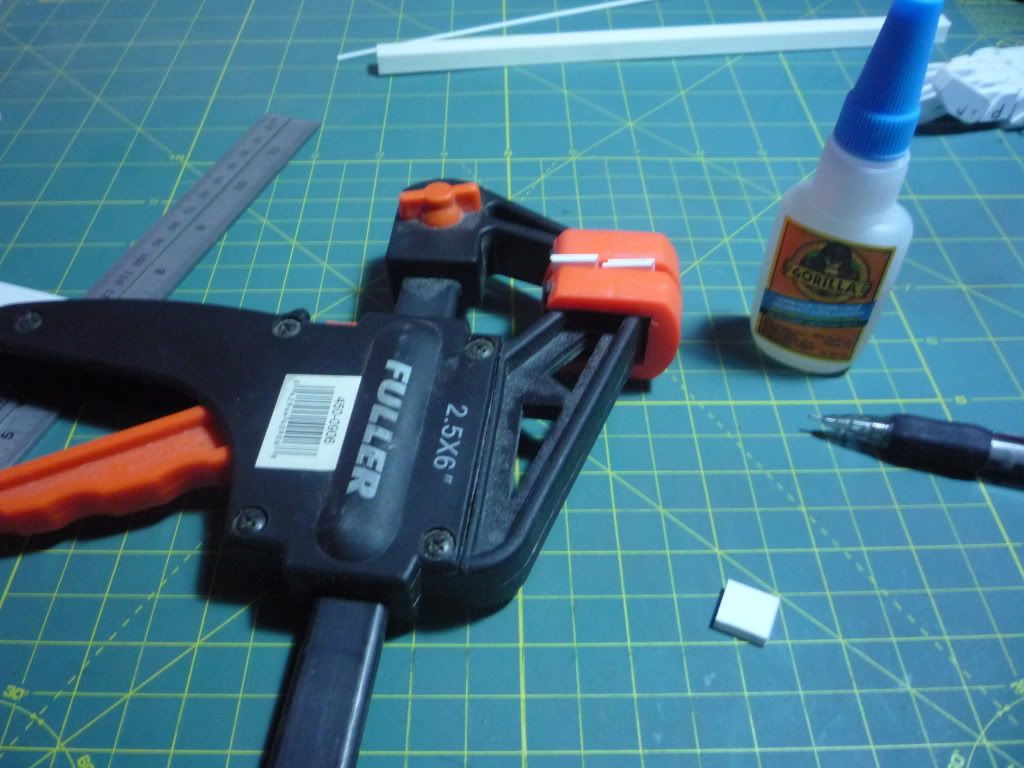
 Glue the outside pieces in the middle of the 1.5" piece and put them into the clamp.
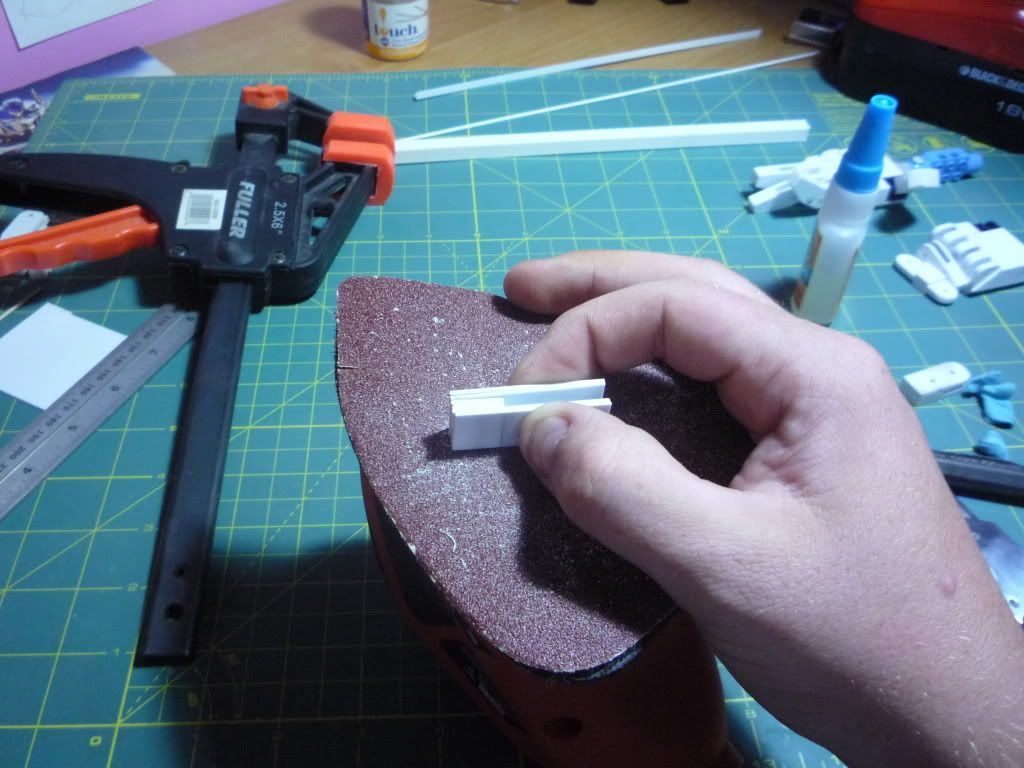
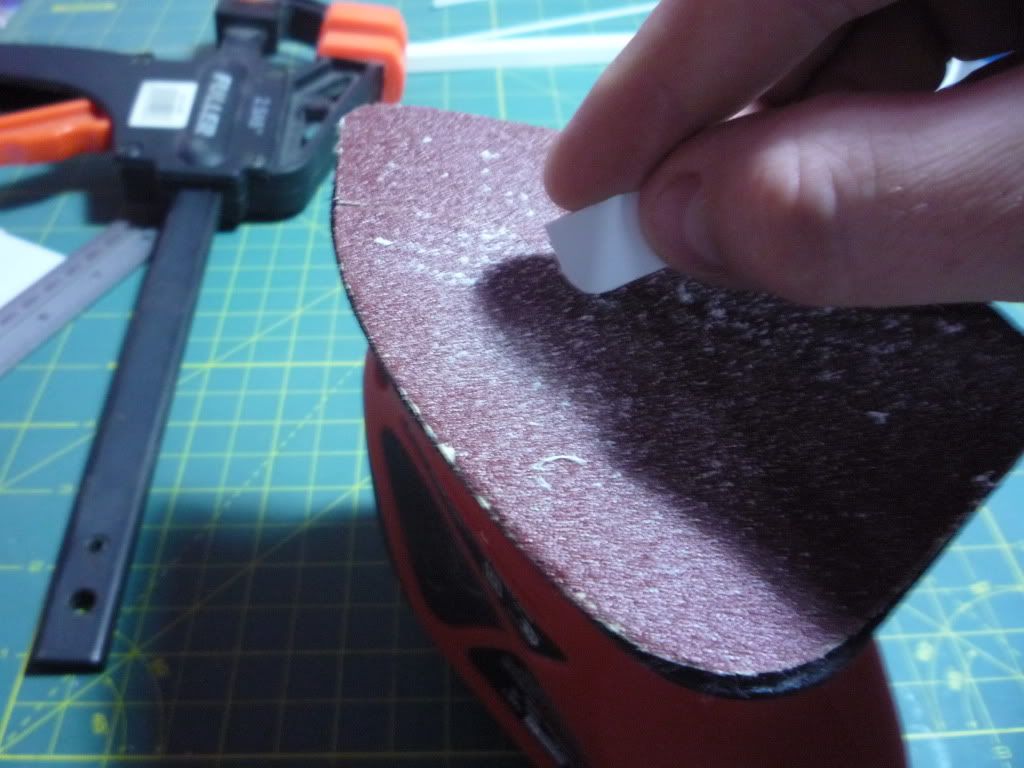
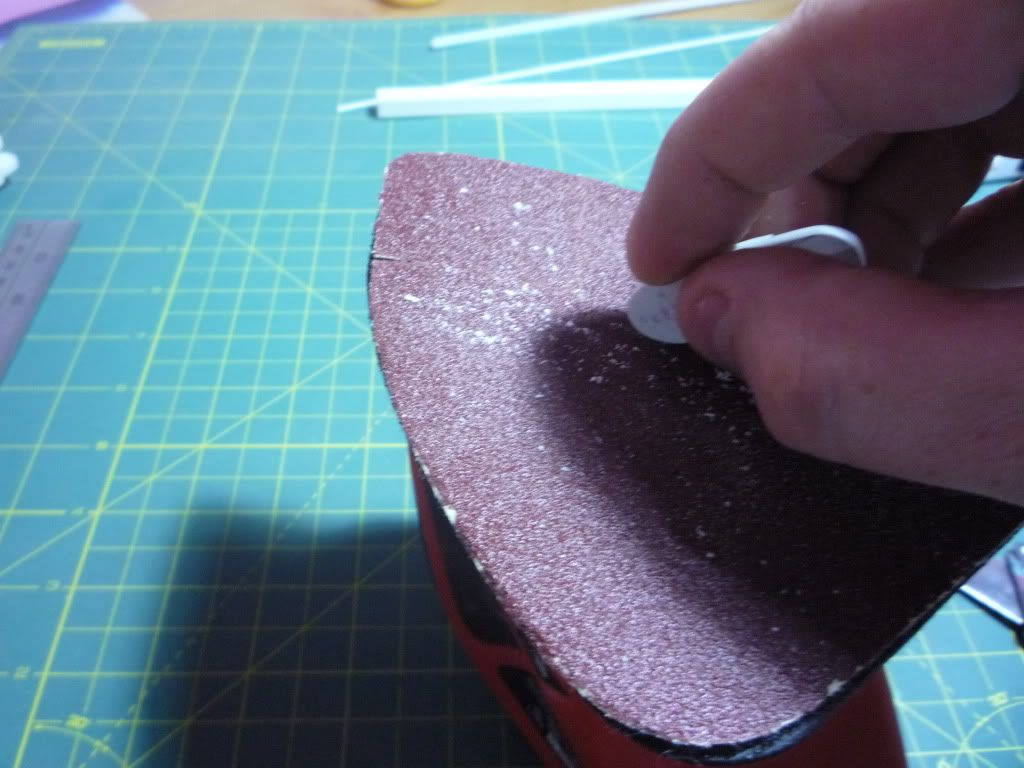
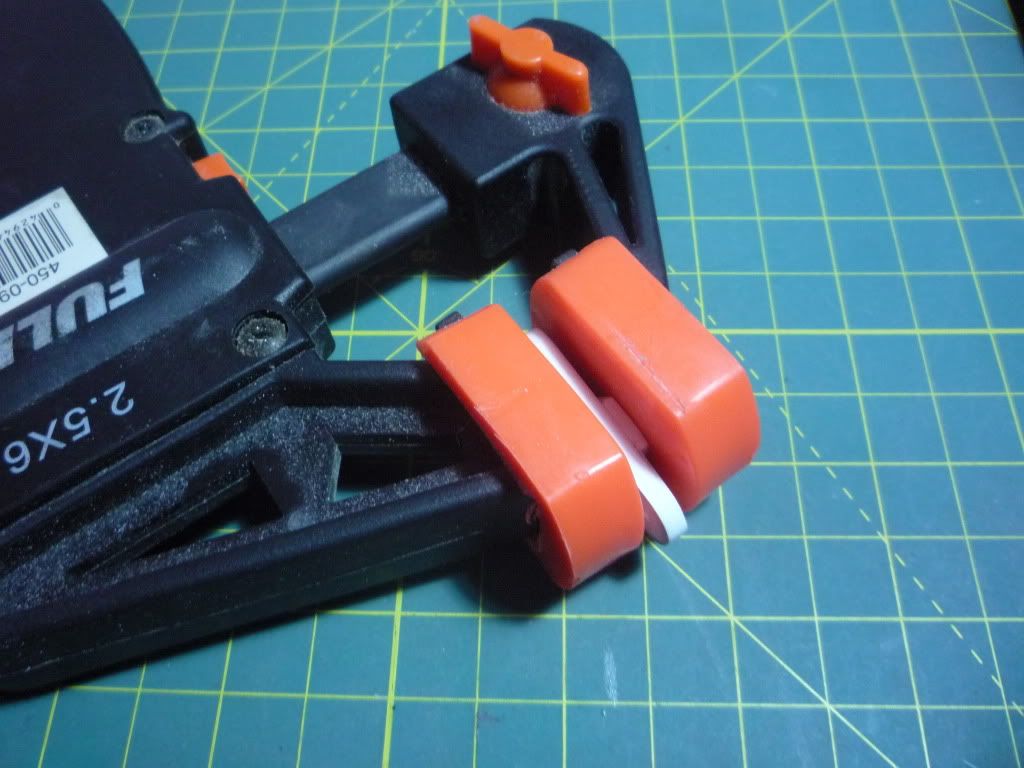 After a few minutes sand everything smooth.
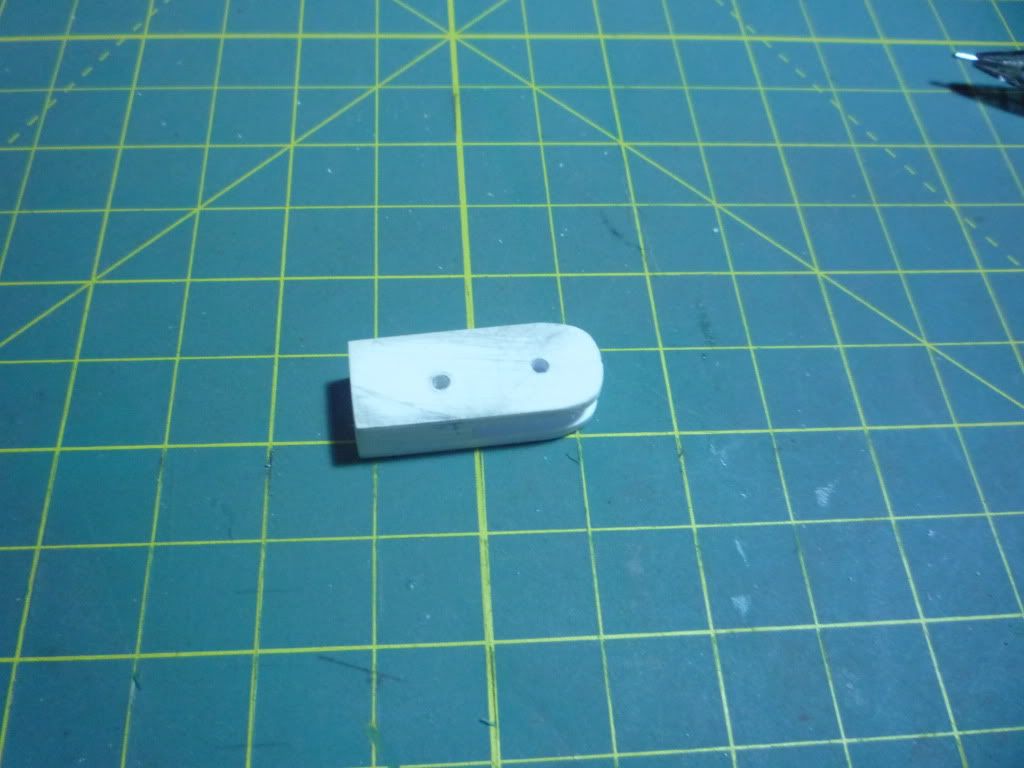
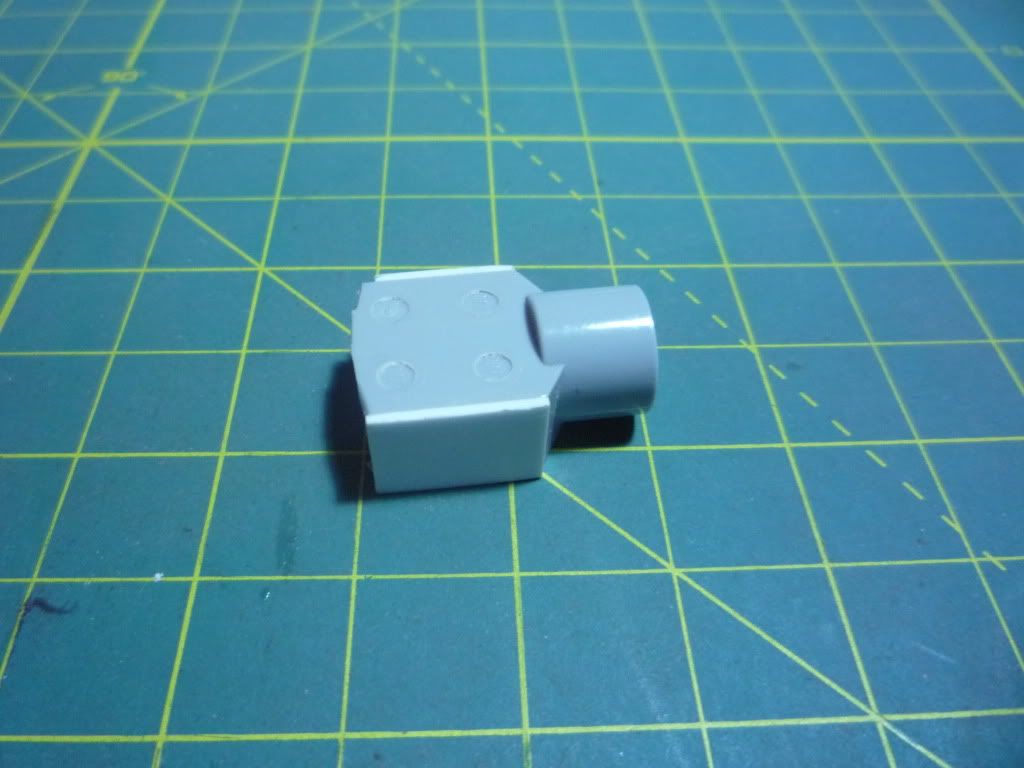
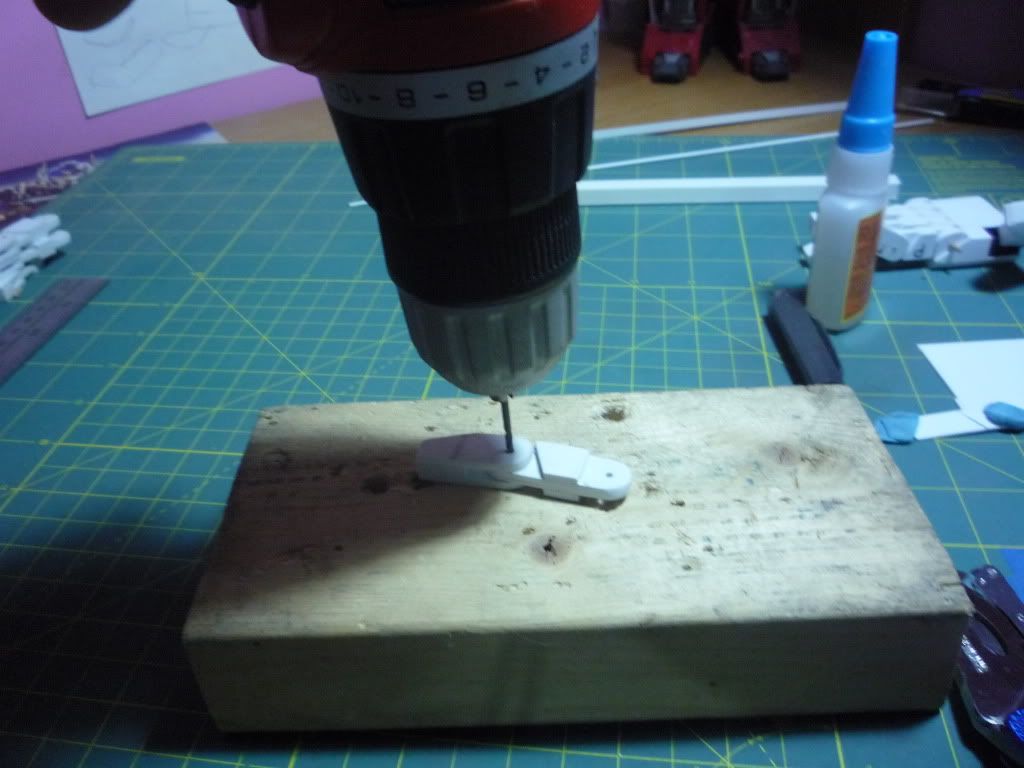
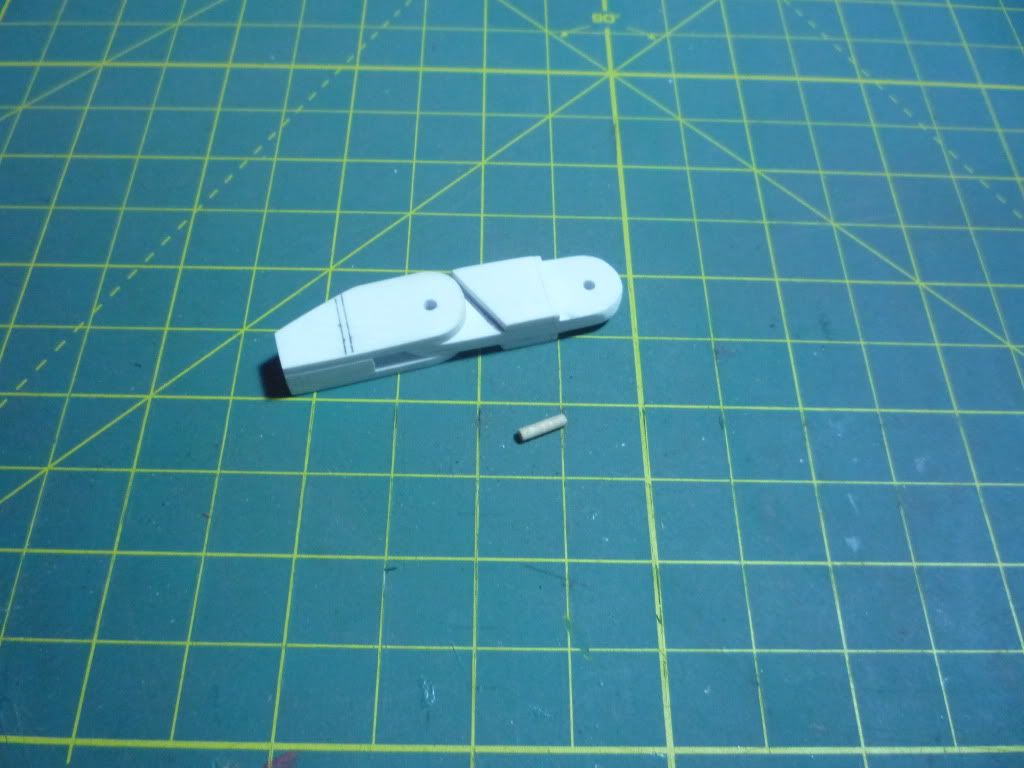
 Now comes the really hard part if you don't have a level in your drill. After you put your finger together and it moves smoothly, time to drill you hole. Go slow, take your time and try to drill a nice straight line. If the lines off your finger wound bend properly.
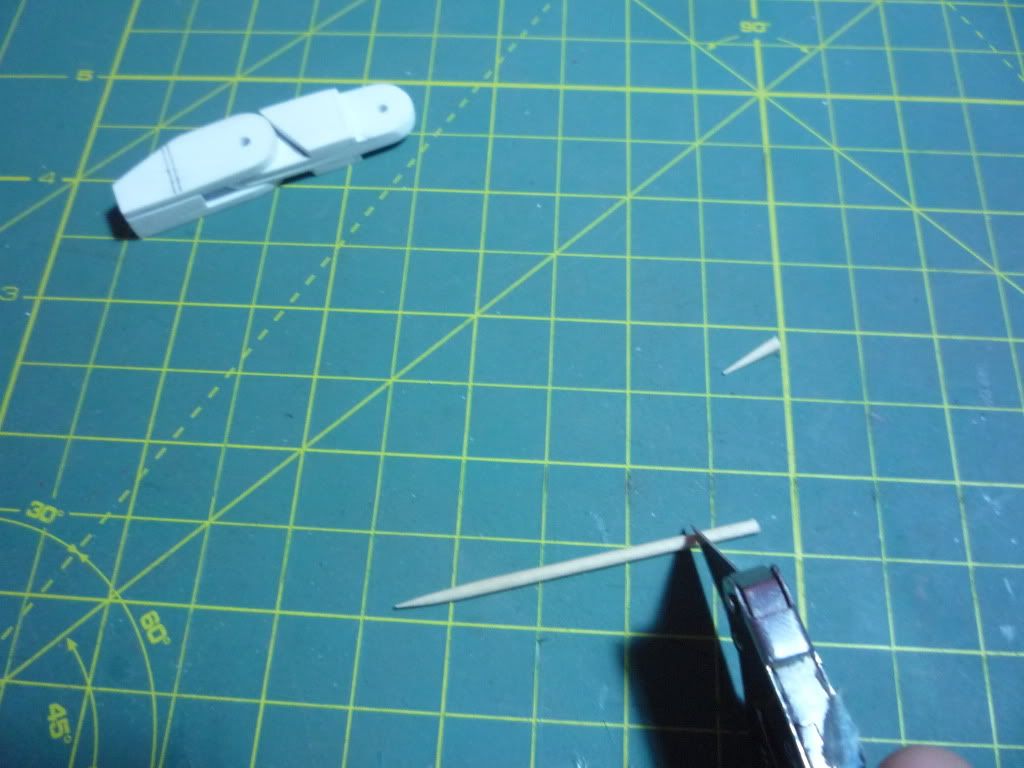
 After you drill your hole time for the mock up pin. I use tooth picks for mock up pins because its cheap and you need to pull the pins out to measure the fingers you made for the other hand.
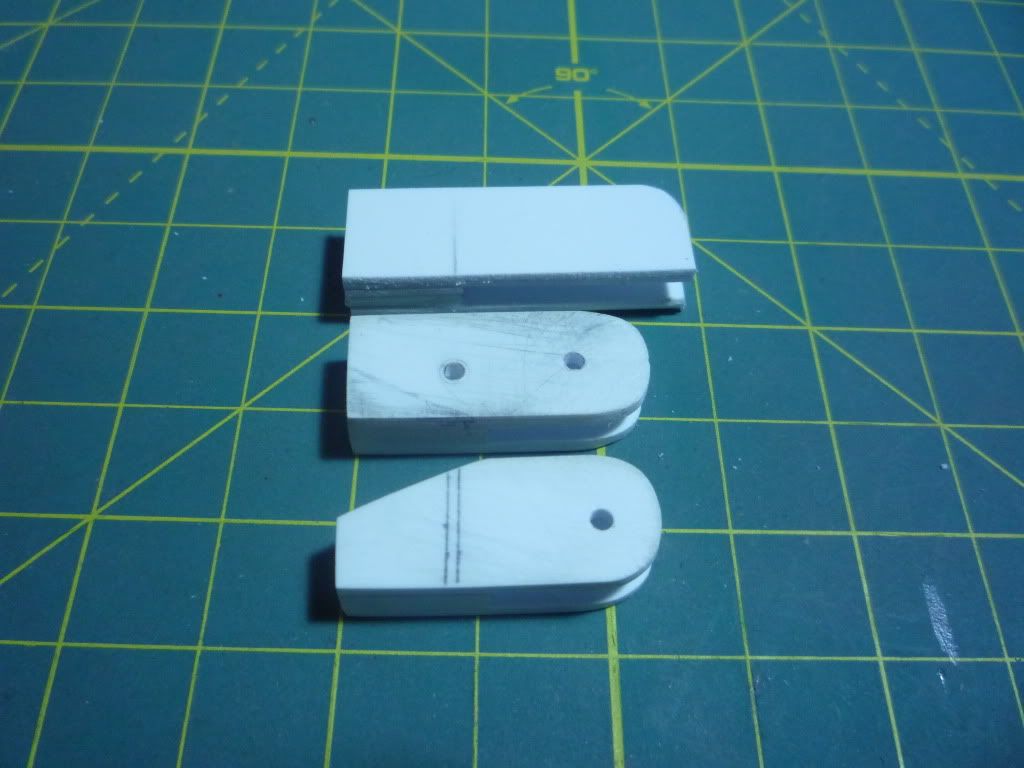
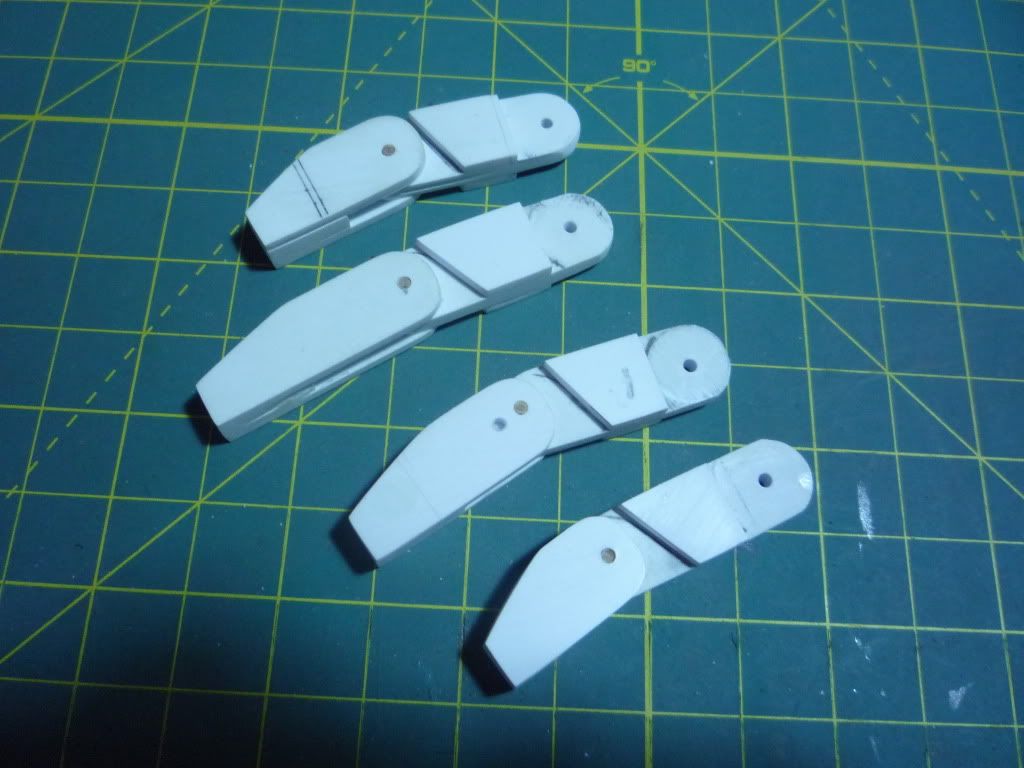
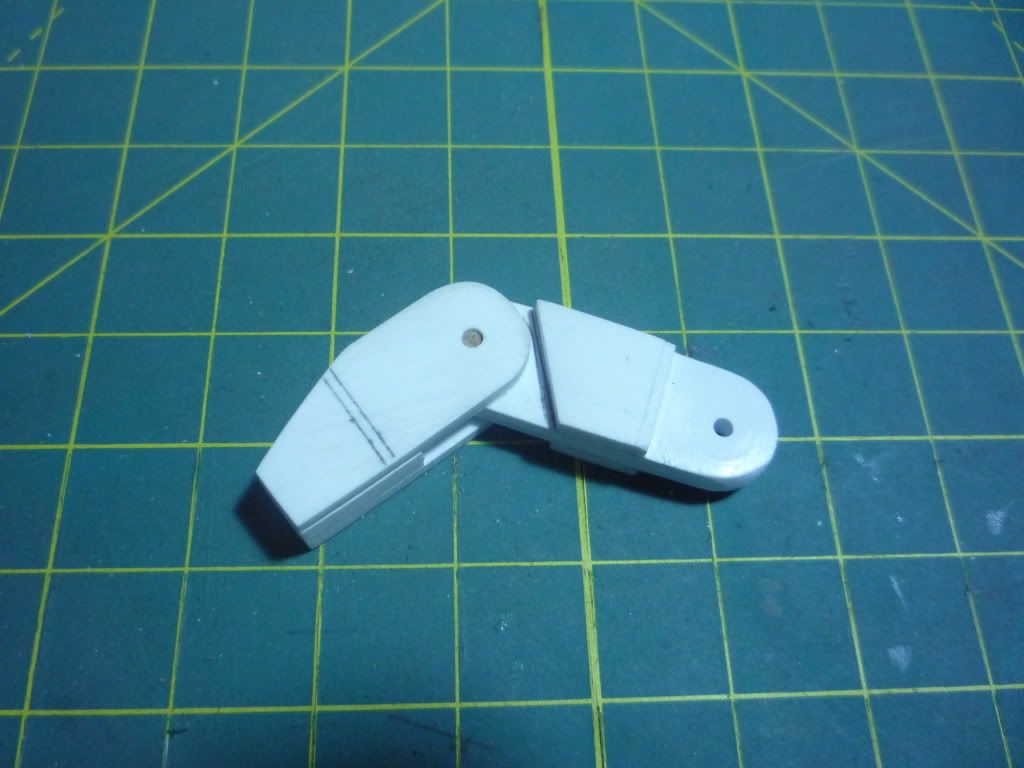 Now that you got your first finger guess what, three more to go, and a thumb Just follow the same steps for the other fingers and you'll be fine. Make the middle finger the longest, the ring the second longest and the pin key the smallest.
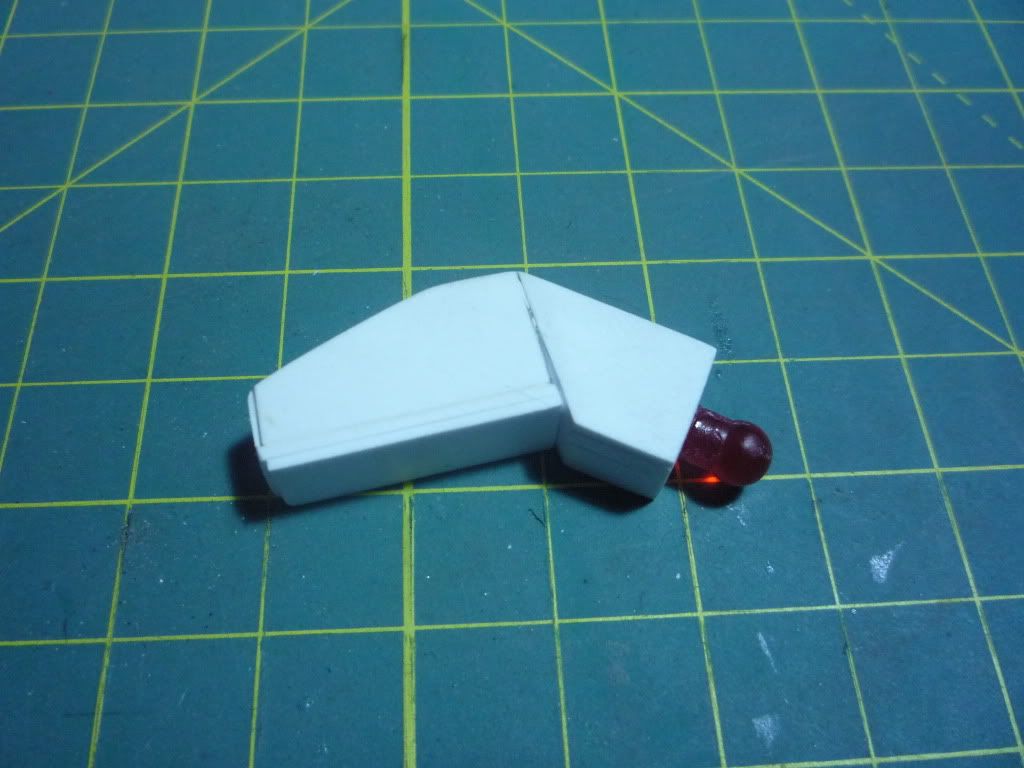
 For the thumb, I glued seven pieces of styrene together and made a non articulated thumb. I drilled a hole in the end and glued a ball joint into the end. Ill leave the thumb design up to the builder, this is my thumb as an example.
__________________
Twitter - Cliffjumper69
Last edited by Cliffjumper69; 08-22-2011 at 01:23 AM.
|
|
|
|
|
08-22-2011, 01:37 AM
|
#5
|
|
|
Re: SUPER AWESOME MEGA SHAZAM FILLED COMBINER SIZED CUSTOM HANDS TUTORIAL THREAD!
I'm pretty sure I'd get the finger stuck to my head trying to apply the glue, lol.
Its amazing to see the step by step process. Thnaks for sharing.
__________________

Visit the official TFcon Toronto website for all the details!
|
|
|
|
|
08-22-2011, 01:50 AM
|
#6
|
|
|
Re: SUPER AWESOME MEGA SHAZAM FILLED COMBINER SIZED CUSTOM HANDS TUTORIAL THREAD!
very cool
__________________
SIDESWIPE: *grumbles* ... the greatest fighting machine in the universe and they make me a janitor!
|
|
|
|
|
08-22-2011, 05:04 AM
|
#7
|
Location: Edmonton, Alberta
|
Re: SUPER AWESOME MEGA SHAZAM FILLED COMBINER SIZED CUSTOM HANDS TUTORIAL THREAD!
That's really cool. I've always wanted to make custom parts especially for my gundams but never had the time or design skills to do as such. I do have a couple of questions though.
After all is said and done how sturdy/durable are the hands? will they hold up with normal wear and tear and play? or are they mostly for display purposes?
Secondly you don't mention what to do with the toothpicks once you're heading into the final steps, should they be replaced by metal pins or something of the like?
Thanks for the tutorial and keep up the good work.
|
|
|
|
|
08-22-2011, 07:58 AM
|
#8
|
|
|
Re: SUPER AWESOME MEGA SHAZAM FILLED COMBINER SIZED CUSTOM HANDS TUTORIAL THREAD!
That's an awesome tutorial, I always suspected that's how it's done but to step by step tutorial is awesome.
|
|
|
|
|
08-22-2011, 11:31 AM
|
#9
|
|
|
Re: SUPER AWESOME MEGA SHAZAM FILLED COMBINER SIZED CUSTOM HANDS TUTORIAL THREAD!
Quote:
Originally Posted by Robimus

I'm pretty sure I'd get the finger stuck to my head trying to apply the glue, lol.
Its amazing to see the step by step process. Thnaks for sharing.
|
Ive done that. I was working on the hands and went out for dinner not knowing I had 2 pieces of styrene glued to my arm and my neck lol 
Quote:
Originally Posted by Sun Swipe Prime
very cool
|
Thanks
Quote:
Originally Posted by Sideslap
That's really cool. I've always wanted to make custom parts especially for my gundams but never had the time or design skills to do as such. I do have a couple of questions though.
After all is said and done how sturdy/durable are the hands? will they hold up with normal wear and tear and play? or are they mostly for display purposes?
Secondly you don't mention what to do with the toothpicks once you're heading into the final steps, should they be replaced by metal pins or something of the like?
Thanks for the tutorial and keep up the good work.
|
The hands are very strong. If buit right they will stand up to anything. Ive dropped my hands a few times and nothing happened to them.
When your hands are ready for paint and final details, swap out the tooth picks for the 0.80" styrene rod. You will need to lightly sand the rod before putting it into the holes. Metal pins work great too! 
Quote:
Originally Posted by Tekkamanraiden
That's an awesome tutorial, I always suspected that's how it's done but to step by step tutorial is awesome.
|
Thanks! I had no idea how much work went into making my hands. I thought it would be a few hours for my first set, but it took me 40+hrs to build them. Now that the tutorial is up I hope I can save people lots of time
__________________
Twitter - Cliffjumper69
Last edited by Cliffjumper69; 08-22-2011 at 11:33 AM.
|
|
|
|
|
08-22-2011, 11:35 AM
|
#10
|
|
|
Re: SUPER AWESOME MEGA SHAZAM FILLED COMBINER SIZED CUSTOM HANDS TUTORIAL THREAD!
Nice! I want to attempt at scratch building parts for custom models. So this tutorial's going to come in handy.
|
|
|
|
|
|
 Posting Rules
|
You may not post new threads
You may not post replies
You may not post attachments
You may not edit your posts
HTML code is Off
|
|
|
|
|
Donate to Cybertron.ca |
Donations keep this site running, thanks for your support. More details here.
|
|